ในกรณีที่ upgrade หรือ restore iDevice แล้วเจอปัญหา หรือ Error
This device is not eligible for the requested build


ซึ่งสาเหตุ เกิดได้จาก ติด firewall หรือ Internet มีปัญหา dns ของเครื่องที่ใช้ในการ upgrade หรือ restore
ซึ่งสามารถแก้ไข ได้โดย

ปัญหา Firewall
เครื่อง Windows
- From the Start menu, choose Control Panel.
- If the Control Panel is in Classic View or Icons View, skip to step 4.
- In Windows 7 click "Security and System." In Windows Vista, click Security, in Windows XP, click Security Center.
- Click Windows Firewall.
- In Windows 7 click "Allow a program or feature through Windows Firewall" on the left side of the screen.
- In Windows 7 and Vista, click Change Settings; if asked for permission by Windows, click Continue; make sure the “Block all incoming connections” option is not selected.
- Click the Exceptions tab.
- Check the iTunes box.
- Click OK.
- From the Apple () menu, choose System Preferences.
- In Mac OS X v10.5 and v10.6, click Security, in Mac OS X v10.4 click Sharing.
- Click the Firewall tab.
- If necessary, click the lock to make changes and enter your admin password.
- Reduce the restrictions on access in the firewall.
- Test the issue.
- If the issue persists, repeat steps 5 and 6.
เครื่อง Windows
Windows XP:
- From the Start menu, choose Run.
- In the Open field type cmd and click OK.
- In the resulting window, type ipconfig /flushdns and press Return on the keyboard.
- You should see a message that the DNS Resolver Cache has been successfully flushed.
Windows Vista and Windows 7:
- From the Start menu, choose All Programs > Accessories and then right-click Command Prompt and choose "Run as Administrator" from the shortcut menu. If Windows needs your permission to continue, click Continue.
- In the resulting window, type ipconfig /flushdns and press Return on the keyboard.
- You should see a message that the DNS Resolver Cache has been successfully flushed.
The hosts file may also be blocking the iTunes Store.
- If you want to have Windows try to restore the hosts to default, follow the "FixIt" in How do I reset the hosts file back to the default?.
Note: Work systems may put information into the hosts file. Consult whomever is responsible for supporting Windows on your system before resetting the hosts file to default. - If restoring the defaults did not resolve the issue, you can find your hosts file at C:\WINDOWS\SYSTEM32\DRIVERS\ETC .
- Select the hosts file. Choose Edit > Copy, and then choose Edit > Paste.
- There should now be a duplicate of the hosts file named "Copy of hosts" (Windows XP) or "hosts -Copy" (Windows Vista/7).
- Drag the original hosts file to your Desktop. If Windows needs your permission to continue, click Continue.
- Drag the "Copy of hosts" (Windows XP) or "hosts -Copy" (Windows Vista/7) to the Desktop.
- Right-click "Copy of hosts" (Windows XP) or "hosts -Copy" (Windows Vista/7) and choose Open. You may be prompted to choose the program you want to use to open this file. Double-click Notepad.
- When Notepad opens, choose Edit > Select All, and then choose Edit > Delete.
- From the File menu,choose Save. Quit Notepad.
- Drag the "Copy of hosts" (Windows XP) or "hosts -Copy" (Windows Vista/7) file from your Desktop back into the original location (given in step 2). If Windows needs your permission to continue, click Continue.
- Right-click the "Copy of hosts" (Windows XP) or "hosts -Copy" (Windows Vista/7) file, and choose Rename. Type "hosts" (without quotation marks) and press Enter.
- Restart your computer and try connecting to the iTunes Store.
- Click the Finder icon in the Dock.
- Choose Go to Folder from the Go menu.
- Type: /Library/Preferences/SystemConfiguration
- Click Go.
- In the Finder window, locate the file named "NetworkInterfaces.plist" and drag this file to the Trash.
- Restart your computer.
- Once your computer has restarted, you will not be able to connect to the Internet. You will need to refresh your network settings to be able to connect again:
- Choose System Preferences from the Apple () menu.
- Choose Network from the View menu.
- If you're using Mac OS X v10.4, choose New Location from the Locations menu.
- Click Apply Now at the bottom right.
- If your network connection requires any special settings, you will need to put them back in at this point. You would have received these from your ISP or network administrator.
The hosts file may also be blocking the iTunes Store.
- Open the Terminal utility located in Applications > Utilities.
- When Terminal opens, open the hosts file by typing entering the following command and pressing Enter:
sudo nano /private/etc/hosts - Type your user password when prompted.
Note: This requires a non-blank admin password. - Edit the hosts file:
The hosts file contains some comments (lines starting with the # symbol), as well as some default hostname mappings (e.g. 127.0.0.1 – localhost).
You can navigate the file using the arrow keys. - If an entry is found containing apple.com, add # and a space to the beginning of that line.
Note: If this is a work system, the hosts file may be used to redirect to local resources, such as software updates. Consult your support resources.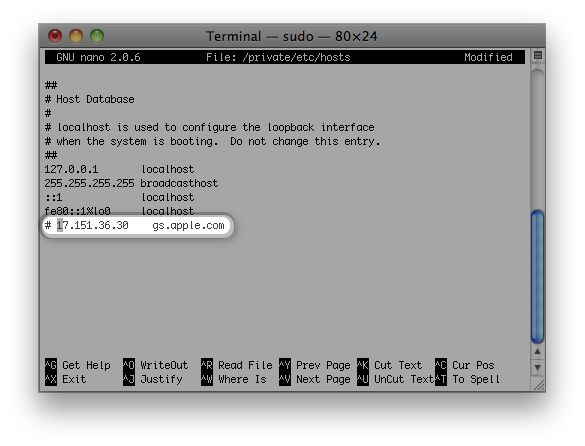
- Save the hosts file.
- When done editing the hosts file, press Control-o to save the file.
- Press Enter on the filename prompt, and Control-x to exit the editor.
- If the issue persists, other software may be running on your Mac that is affecting the connection.

ปัญหาอื่นๆ
เครื่อง Windows
Configure Internet Options (for Windows computers only)
- Run iTunes Diagnostics. If the "Secure link to iTunes Store" section does not pass, do the following.
- Open Internet Explorer.
- From the Tools menu, choose Internet Options.
- Click Connections.
- Under "Dial-up and Virtual Private Networking," choose "Never dial a connection." It may not be possible to choose this if you’ve never used dial-up Internet; if this is the case, skip to the next step.
- Click LAN Settings.
- In the window that opens, enable the option to "Automatically detect settings" if it is not enabled.
- iTunes uses Internet Options proxy settings. Apple recommends removing proxy settings that interfere with access to the iTunes Store if needed.
- Click OK.
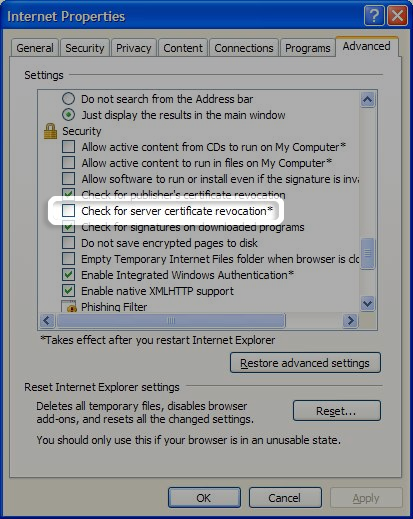
- Click the Advanced tab.
- Scroll down to the Security section and look for the option to "Check for server certificate revocation." If it is enabled, disable it.
- Look for Use SSL 3.0 and Use TLS 1.0. Make sure at least one of those two checkboxes is selected and click OK (You can select both checkboxes).
- Apply any changes, and restart your computer if you modified the option to "Check for server certificate revocation" (step #11).

ไม่มีความคิดเห็น:
แสดงความคิดเห็น